
Setting up the Istio Service Mesh
On-prem AI Infrastructure series
11 August 2025
This article series is dedicated to advancing research in Kubernetes and AI.
In this article we setup the Istio service mesh, which is required by Kubeflow.
I found Kubeflow docs to be slightly difficult to navigate for on-prem infrastructure, especially the manifests provided by them.
Since there is no official helm chart for installing Kubeflow
and the manifests provided by them contain lots of configurations I couldn't be bothered about,
I decided to configure it by myself from the beginning.
This article provides you with the instructions to quickly setup Istio for Kubeflow.
Prerequisites
In the previous article we initialized a three node kubernetes cluster with configurations that support Istio with Cilium. This article assumes a similar setup.
- Kubernetes cluster initialized with Cilium CNI
- Cilium without its Kube-proxy replacement
- Cilium initialization sets the parameters socketLB.hostNamespaceOnly=true and cni.exclusive=false
- Helm installed
- View my setup for more details.
Setting up Metallb
Metallb provides a network load balancer for the Kubernetes cluster.
For Cloud implementation of Kubernetes clusters like AWS's EKS, GCP's GKE, Azure's AKS, etc. the load balancer is managed by the cloud provider.
For bare metal setups, however, you'll need to setup a load balancer implementation yourself.
Metallb provides you just that. In my setup, I have three nodes on Cloudlab, and each of them has a Public IP.
With Metallb I will be able to create a LoadBalancer type service.
There are other ways to go around this. If you have enough network resources, you can use
Cilium BGP.
If you have a setup like mine, here are the instructions to setup Metallb.
Set Kube-Proxy to be in Strict ARP mode (ref: metallb)
kubectl get configmap kube-proxy -n kube-system -o yaml | \
sed -e "s/strictARP: false/strictARP: true/" | \
kubectl apply -f - -n kube-system
Add Metallb Helm Repo
helm repo add metallb https://metallb.github.io/metallbInstall Metallb
helm install metallb metallb/metallb -n metallb-system --create-namespace --wait
Configure Metallb IP Pool (ref: https://support.tools/install-metallb-istio-ingress-mtls-kubernetes/).
Though this configuration uses a public IP (because I have that available on all my nodes).
If you want have a smaller setup with fewer network resources, you can also go for a private IP range (this resource does exactly that).
Create a file named metallb.yaml with the following content:
apiVersion: metallb.io/v1beta1
kind: IPAddressPool
metadata:
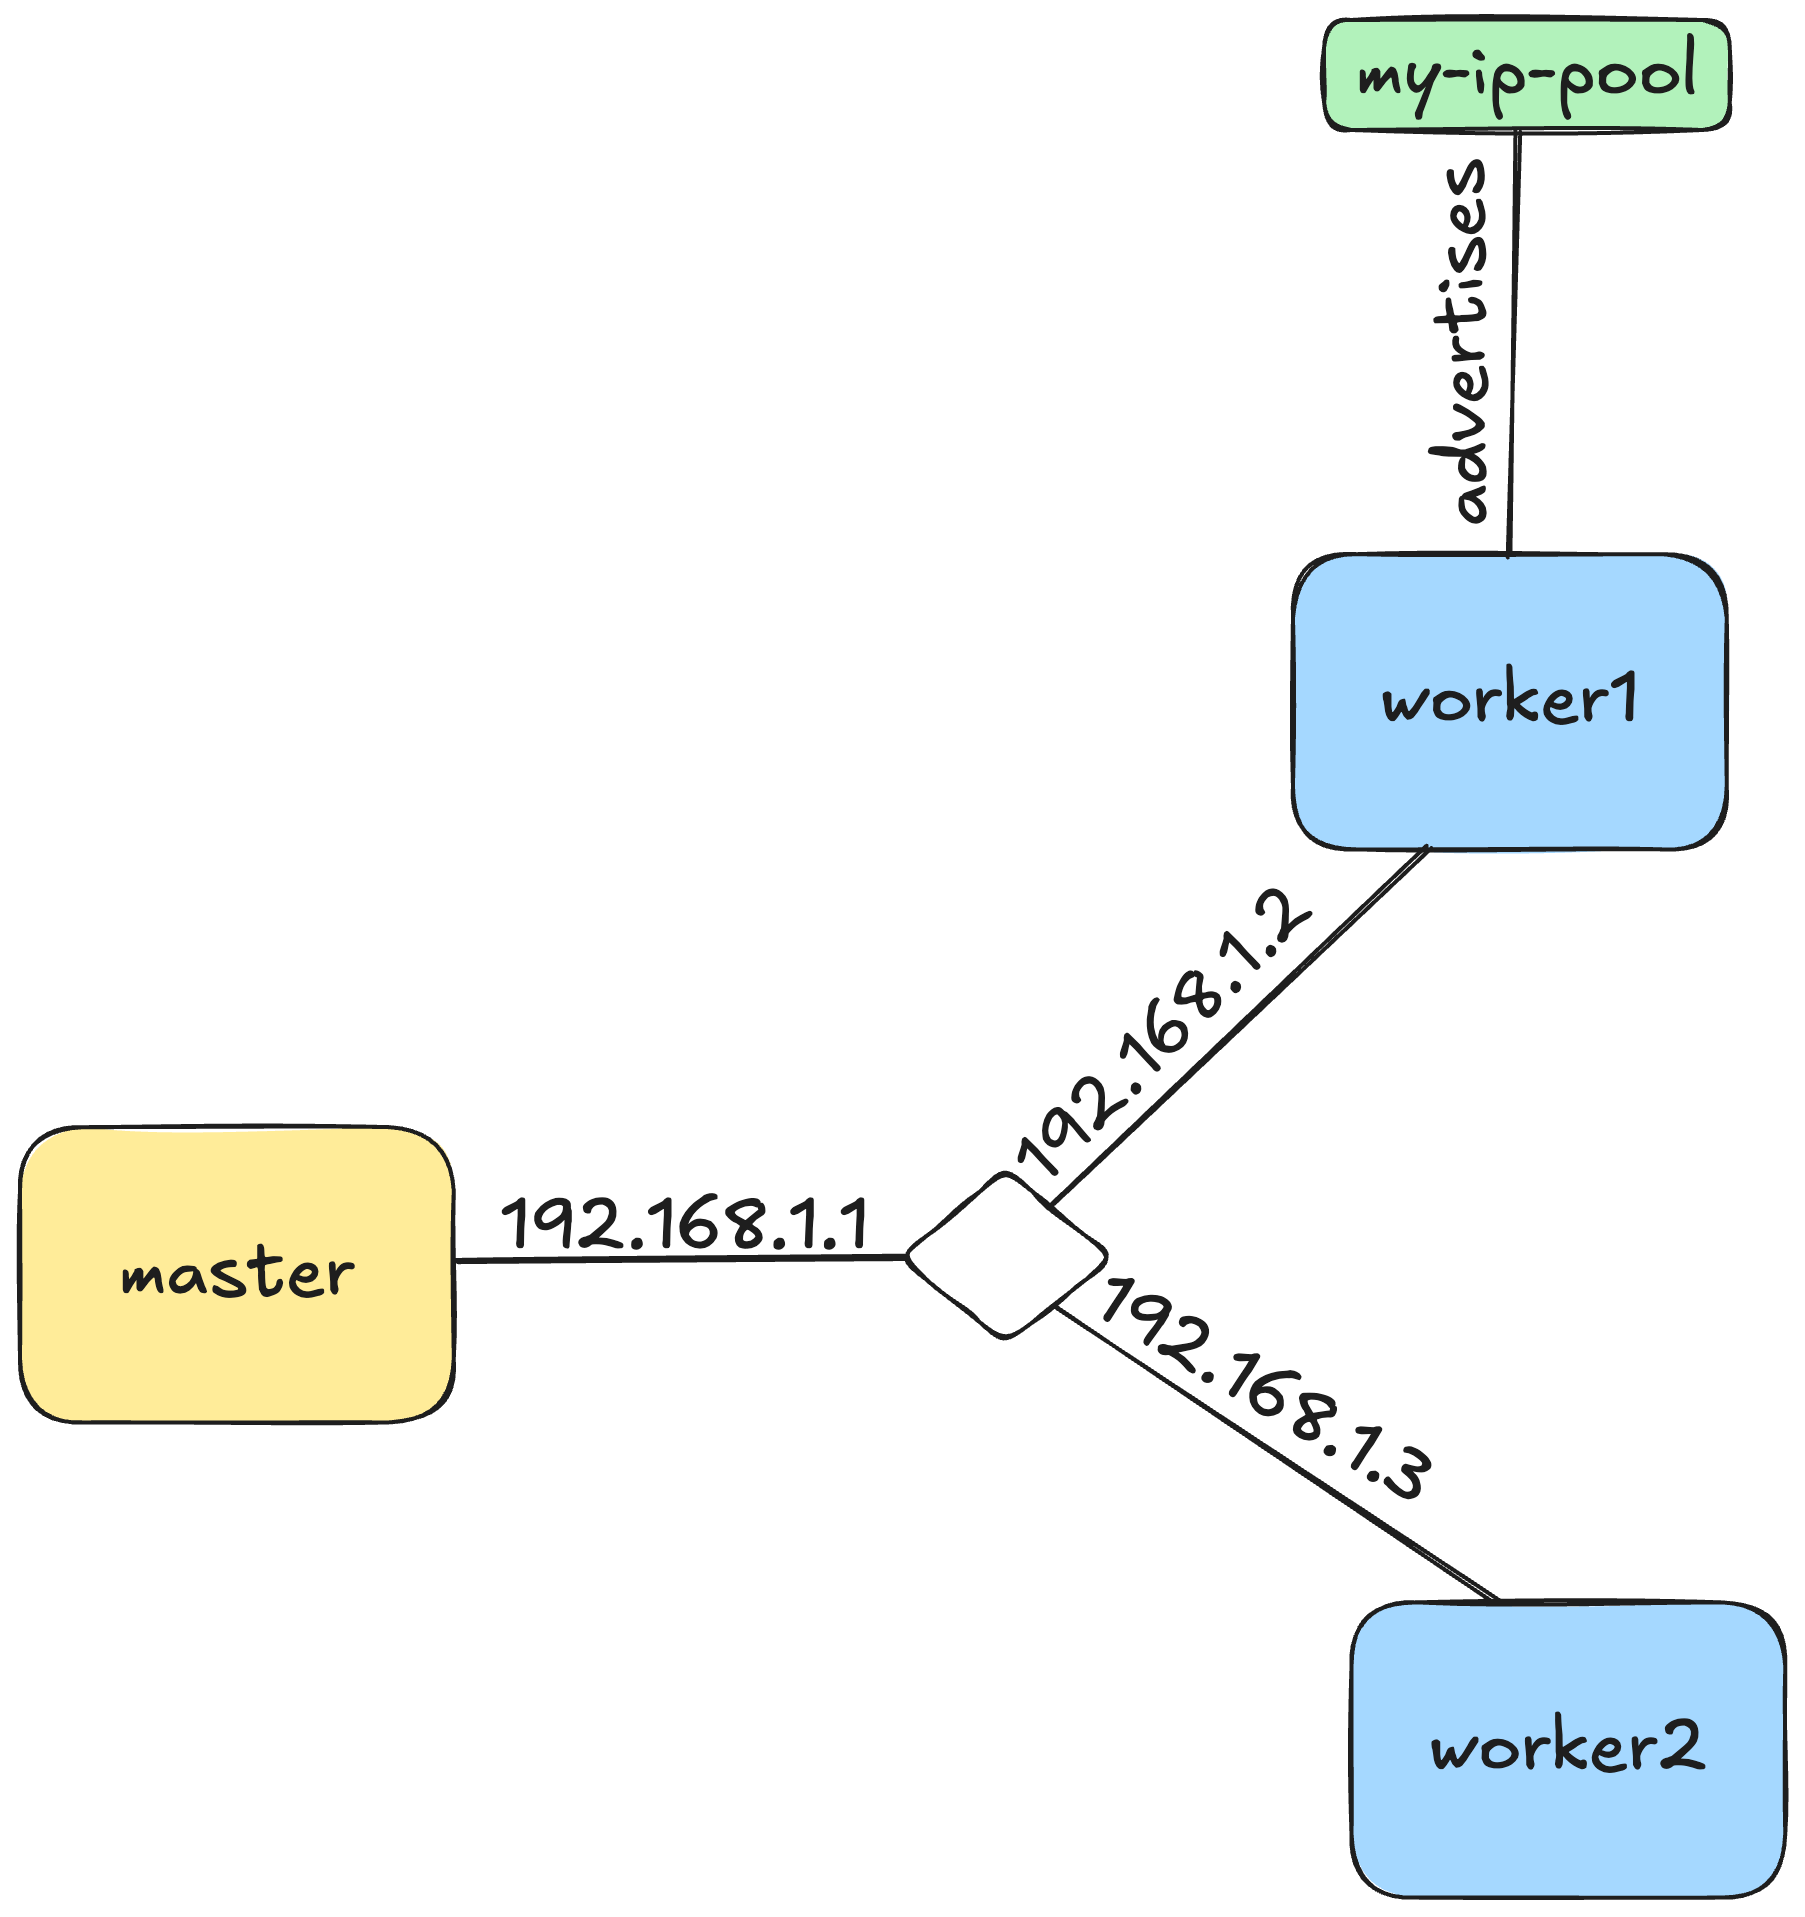
name: my-ip-pool
namespace: metallb-system
spec:
addresses:
- {public_ip_worker1}
---
apiVersion: metallb.io/v1beta1
kind: L2Advertisement
metadata:
name: my-l2-advertisement
namespace: metallb-system
spec:
ipAddressPools:
- my-ip-pool
nodeSelectors:
- matchLabels:
kubernetes.io/hostname: worker1
The first part of the yaml specifies an address pool for LoadBalancer services.
In this case we only have one IP address (of worker1 node) as that's the only one we want to work with for this setup.
The second part of the yaml creates a L2 Advertisement, but only on worker1 node.
This resource makes sure that the worker1 node is the only node that serves the IPs from the ip-address-pool we created.
Any request coming to the node will either served by the node itself or routed internally within the cluster
(ref: metallb).
It must be noted that this configuration is not ideal and safe; but it is simple enough to work for a small infrastructure.
Apply the configuration with the following command:
kubectl apply -f metallb.yamlIt looks like this
Setup Istio and Istio Ingress-Gateway
Now we setup Istio and the support for Istio Ingress Gateway.
To keep things simple, we'll go with the
Helm approach
instead of of the complicated manifests provided by Kubeflow.
Add istio repository and install istio.
helm install istio-base istio/base \
    -n istio-system \
    --set defaultRevision=default \
    --create-namespace \
    --wait
For the Sidecar mode, the Istio CNI mode is not required but it is safer this way. This helps avoid running a privileged container on every workload. (ref: istio docs)
helm install istio-cni istio/cni \
    -n istio-system \
    --wait
Next setup the istiod service.
helm install istiod istio/istiod \
    -n istio-system \
    --wait
Install Istio Ingress Gateway
helm install istio-ingress istio/gateway \
    -n istio-ingress \
    --create-namespace \
    --wait
The above command creates an istio-ingress pod in the istio-ingress namespace. In our case, this creates a shared gateway that handles the routing for the istio service mesh. It also creates the istio-ingress LoadBalancer service in the same namespace. This service routes the traffic external to the cluster to the istio-ingress pod which, in turn, handles the internal routing.
Validate setup
Deploy the Httpbin application. (ref: istio docs)
kubectl apply -f https://gist.githubusercontent.com/rutu-sh/346e59fdc335243620c61969c5fe56fe/raw/06af833f6f19514e3f2d7ccefbf371cc5ceb1add/istio-httpbin.yamlCreate gateway and the virtual service. Note that I have set the hosts to be httpbin.rutu-sh.com as I own the domain. You can add your own domain or, to make it even simpler, use httpbin.example.com as mentioned in the istio docs. The approach mentioned in the istio docs might be easier, and you can get away with using private IP ranges.
kubectl apply -f https://gist.githubusercontent.com/rutu-sh/fdb9c425301f7792d8683d3da97f09a3/raw/5f85736d85ea9b80365d2d447e876e87d3dc2f89/httpbin-gateway.yamlkubectl apply -f https://gist.githubusercontent.com/rutu-sh/ad5d21d093ddf0df06bc28c063d73e2e/raw/b59f55ab3cf7802735d29376b40b9406a41d5684/httpbin-virtsvc.yaml
After this I added a Type A DNS record for httpbin.rutu-sh.com pointing to the public IP of the LoadBalancer service.
Next test with curl.
If you have a similar setup as mine, the following command will work for you.
curl -i http://httpbin.rutu-sh.com/status/200Otherwise, if you're using private IP ranges with example.com domain, run the following from your master node. (ref: istio docs)
export INGRESS_HOST=$(kubectl -n "$INGRESS_NS" get service "$INGRESS_NAME" -o jsonpath='{.status.loadBalancer.ingress[0].ip}')
export INGRESS_PORT=$(kubectl -n "$INGRESS_NS" get service "$INGRESS_NAME" -o jsonpath='{.spec.ports[?(@.name=="http2")].port}')
export SECURE_INGRESS_PORT=$(kubectl -n "$INGRESS_NS" get service "$INGRESS_NAME" -o jsonpath='{.spec.ports[?(@.name=="https")].port}')
export TCP_INGRESS_PORT=$(kubectl -n "$INGRESS_NS" get service "$INGRESS_NAME" -o jsonpath='{.spec.ports[?(@.name=="tcp")].port}')curl -s -I -HHost:httpbin.example.com "http://$INGRESS_HOST:$INGRESS_PORT/status/200"Results in the following output.
HTTP/1.1 200 OK
access-control-allow-credentials: true
access-control-allow-origin: *
content-type: text/plain; charset=utf-8
date: Tue, 12 Aug 2025 02:46:21 GMT
content-length: 0
x-envoy-upstream-service-time: 20
server: istio-envoy
Enabling mTLS with Istio
#TODO: check back in later 🙂